Alerts
Alerts are messages for hotel staff that are displayed as pop-up screens either when the reservation is accessed for review or update, at check in, or at check out. For example, when the guest checks in a message such as, "Advise guest of local events" might be displayed. Or, when the guest checks out the alert might remind staff, "Obtain credit card information if guest pays by personal check."
Notes:
Alerts are purged thirty days following check out (or, for canceled or no show reservations, 30 days following the proposed stay end date).
Alerts are not propagated from the original reservation to any add-on reservations that may be created from it.
Global alerts can be configured and automatically applied to all reservations of a given status depending on a set of pre-configured conditions. See Global Alerts for details.
When you set up a new alert and you select the Alerts button from the Reservation Options menu, the Alerts Input screen displays when there are no existing alerts attached to the reservation. When you edit or delete existing alerts the Alerts screen appears. (The Reservation Options menu is accessible from the Reservation screen or from the Reservation Search screen .)
The Alerts screen shows the following information for the alerts attached to a reservation:
Code. The alert code. (These messages are configured using Alert Message Setup.)
Area. The type of alert: Reservation, Check In, or Check Out. The area of an alert determines when it is displayed. (See Adding a New Alert to a Reservation or Editing an Alert for more information on areas.)
Description. The text of the alert. Each alert code can have a default text associated with it. This text can be accepted without change or it can be edited.
Seq. Shows the display sequence configured for the alert. The alerts are displayed on this screen in the order that they were entered for the reservation, no matter the display sequence that is assigned to them. The display sequence is used when the alerts are displayed to the user. So the alerts with a display sequence of 1 are displayed first, then the alerts with a display sequence of 2, and so on.
Use the New, Edit, and Delete buttons to attach a new alert to the reservation, edit an existing alert, or delete an alert.
To add a new alert to the reservation, select the New button from the Alerts screen. To edit an existing alert, highlight the alert on the Alerts screen and select the Edit button. The Alert Input screen appears.
Note: If you attach an alert to a reservation that is part of a business block, a message asks whether you want to attach the alert for just the current reservation or all reservations with the group.
Provide the following information and select the OK button:
Code. Select the down arrow to display the Alert Codes list of values. When you select a code, the default text associated with the code, if any, appears in the Description field. If you are editing an existing alert, the code cannot be changed. (These messages are configured using Alert Message Setup.)
Area. Select the area of the alert. The area determines when the alert will be displayed. (See Alert Display, below.) If multiple alerts of one area are attached to the reservation, they will be displayed in the order in which they were attached to the reservation (that is, the oldest alert will be displayed first).
Display Seq. Enter the number to assign the order that the alert will be displayed to the user. The lower the number, like 1 or 2, that is assigned to the alert, the higher the priority it is given and displayed to the user.
Description. Enter the text of the alert. Each alert code can have a default text associated with it. The default text can be accepted without change or it can be edited.
Screen Notification. Select this check box to provide alert notification to the user on-screen when the alert criteria are satisfied. This check box is selected by default.
Printer Notification. Select this check box to provide alert notification by printing a selected alert report at the designated printer.
Alerts can be output on screen (if the Screen Notification option was selected (this is the default), at a designated printer if Printer Notification was selected, or both if both options were selected..
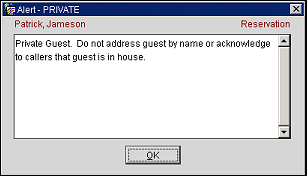
For screen notification, the alert pop-up screen looks like this. Select OK to close the pop-up screen.

If Printer Notification was displayed, the specified alert report prints at the designated alert printer.
See Also