Configure OPERA for Quick Address Software
Set up the Quick Address Software settings in OPERA.
From the OPERA System Configuration Menu, select Setup>Application Settings and set the application function Profiles>Quick Address to Y. The new menu option Quick Address Setup now displays as the last option in the Configuration>Profile menu. The configuration instructions explained in this topic pertain to Quick Address Software Version 3.10 for Windows NT only.
Note: You may notice that there are other, seemingly related, application functions, parameters and settings that refer to address cleansing. However, both the application function Profiles>Address Cleansing and application setting - Address Cleansing Timeout are also used to configure external address cleansing interfaces. Therefore it will always be available from the Application Settings menu regardless of whether Quick Address Software is installed or not.
Set up the OPERA user permission to grant users access to the Quick Address Setup menu option The permission required for access to the Quick Address Setup menu is Profiles Config>Quick Address Setup. From the OPERA System Configuration Menu, select Setup>User Configuration>Users.
- Select the user for whom the permission is to be granted and select Edit.
- From the Edit User - User Name screen, select the Permission button to display the User Permissions screen.
- Select the required permission from the Non-Granted User Permissions list (Profiles Config>Quick Address Setup) then click the Grant button. Select the OK button to exit the User Permissions screen and then Close to exit out of the subsequent screens.
Define Preferences in the Quick Address Setup Menu
Use the Quick Address Setup menu to customize the OPERA work environment for interacting with the Quick Address Software.

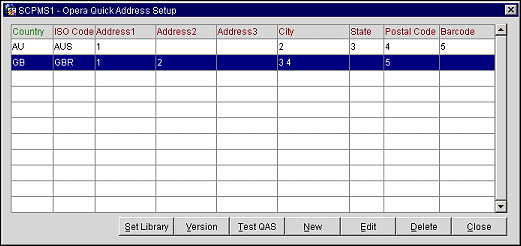
- Select Configuration>Profile>Quick Address Setup to map your properties’ country code to the ISO code provided from Quick Address Software for the data that has been installed.
- Select Set Library; this setup screen contains the path where the library that holds the database is stored.

- For the Windows NT Server, verify that the existing DLL path is <drive letter>:\qas\qapwved.dll.
Note: If this path setting is changed, or if the Quick Address software files cannot be located within the OPERA Database Server, OPERA displays the error message Unable to locate information based on the Quick Address Software path configured during the user entry. Ensure the library path is set to the directory where Quick Address Software is installed on the OPERA Database Server.
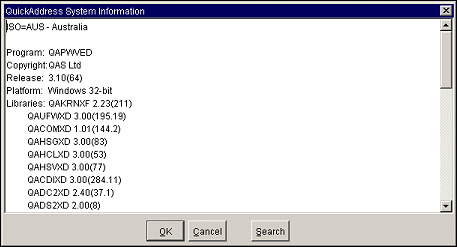
- Select Version. This System Information screen displays all the important information about your Quick Address Software installation and software. The supported version for Quick Address is V3.10.

- Make a note of the path for the qapwved.dll file. If you accepted the default settings for the Quick Address Software database installation, your file directory path should be <drive letter>:\qas\qapwved.dll.
- Next, select New from the Quick Address Setup screen to set up your country information and map the fields that come from the string of data in Quick Address Software to the matching fields in OPERA. When selected, OPERA displays a list of values containing all of the properties’ country codes.
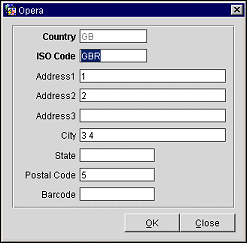
- Select the country code you want for setting up the OPERA mappings. Quick Address Software has a default address layout for each ISO code, and you set the mappings. The country will default to the country that you specified in the previous step.
- Enter the ISO code for the data that you have installed, for example: GB for country, and GBR for the Quick Address Software data CD that was installed.
- The available fields to be mapped in OPERA are Address1, Address2, Address3, City, State and Postal Code. The Quick Address Software standard address format displays with five lines. OPERA inserts Quick Address Software address information that matches the mapping order of the specified fields. As shown in the example below, you can join multiple fields together from Quick Address Software into an OPERA field to display the results on a single line rather than on separate lines.

You can define specific text or information to always display if the user enters the code on the profile. For example, if you want a ‘#’ sign to always display before the Address1 field, you can map ‘# 1’ into the Address1 field so that each address will be preceded with a # before the address.
Note: Search strings are invoked by the Address1 field for county codes AU and NZ (Australia and New Zealand).
Customize the Profile Screen through Screen Design
Set a Tab Order Search
You will need to set the tab order for Country and then Postal Code, as these are determining factors in searching for an address. The tab order is set through the Screen Painting function. See Screen Painting for more details on how to set the tab order on the following profile screens:
- Individual Profiles
- Group Profiles
- Company Profiles
- Source Profiles
- Contact Profiles
- Travel Agent Profiles


