Extension Configuration
For most systems, this is done automatically through the interfaces. This function is specific to certain instances and hotel chains.) The function allows the selection of an Extension number when checking a guest into a room with a single entry door, but that has multiple phone lines.
But if you need the ability to manually select the phone extension when checking a guest into a room, here are the steps for configuring the extensions.
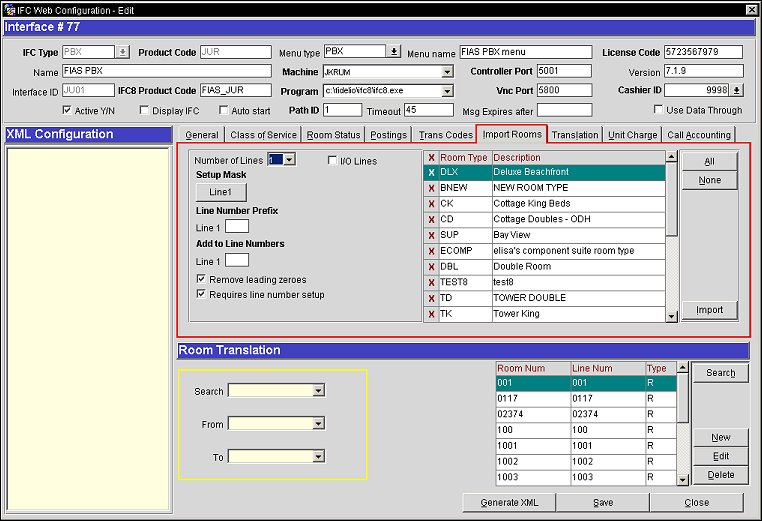
When the General > Extensions application function is set to Y, select Configuration > Setup > Property Interfaces > Interface Configuration to display the Interface Status screen (see Interface Status for details). From here select the interface that the extensions need to be configured for and select the Edit button. The IFC Web Configuration form is then displayed and the Import Rooms tab then needs to be selected.
The Import Rooms tab of the form is for activating and configuring extensions for room types. But the Room Translation section of the form allows a user to configure extensions for specific rooms.

Select a room type from the grid to the right and configure the applicable line types. Complete the following desired fields and select the Import button. The information appears in the Room Translation Grid at the bottom of the IFC Web Configuration screen and also in the Submenu (Shift+F8).
Number of Lines. Select the number of lines that you would like to import for your IFC room configuration. For example, if a room has three lines - extension 1, extension 2, and a fax line, you would select 3.
Setup Mask. Depending on the number of lines defined in the Number of Lines field, one or more Line XX buttons appear, where "XX" is the line number. Select the Line XX button to access the Setup Mask screen and enter the mask field information for the selected line type. See Entering Setup Mask Information for a Room Type for details.
The following two check boxes activate and make extension selection mandatory.
Activate Extension. Available when the General > Extensions application function is set to Y, select to activate the extension for the selected Line XX for the highlighted room type that was selected on the Import Rooms tab.
Mandatory. Available when the Activate Extensions check box is selected, select the check box to insure that an extension number must be elected when a guest is checked in to this room. If an extension is not mandatory, then it can be assigned before check in, during check in, a room move, or anytime while the guest is inhouse.
Line Number Prefix. Enter the number that you would like to precede the room number when creating your external line number. You need to do this for each line that exists in the room (the number of lines are defined in the Number of Lines field.
Add to Line Numbers. Enter the numerical value that you would like to add to the line number during an import. For example, if the room number is 100 and you enter 50 in this field, when the import is done, the line number would become 150.
Remove leading Zeros. Select this check box to remove the leading zeroes on a room number prior to adding a prefix. This check box will become inactive once the Activate Extensions check box is selected from the Setup Mask option.
Requires line number setup. Select this check box if you require line number conversion for this interface (the line number must exist in the Room Translation grid). For example, when there are 2 DLS Interfaces and outgoing messages for specific rooms are to go to only one of them. It is not necessary to have this checked to Import rooms. If this is checked on a POS IFC, pre and post stay charging will not be allowed.
The following is how to set up extensions for specific rooms at the property. The Room Translation area displays all of the rooms from the IFC_ROOM table in the OPERA database.
Room Num. The room number.
Line Num. The telephone line number associated with the room.
Type. This identifies the interface type (type of line). The available types are:
Extn Y/N. Displays a Y if the extension has been activated and displays an N if the extension is inactive.
Mandatory. Displays a Y if an extension must be selected during check in and a N if an extension can be assigned before check in, during check in, a room move, or anytime while the guest is inhouse..
Edit. Select to edit the highlighted room in the grid.
Complete the following desired fields and select OK.
Type. Select the type of line. The available options are:
R1 - Line 1
R2 - Line 2
H - House
B - Booth
From Room Num. Select the first room in the range from the list of values.
To Room Num. Select the last room number in the range from the list of values.
Room Num. Select the room number from the list of values.
From Line Num. Select the first line number in the range from the list of values.
To Line Num. Select the last number in the range from the list of values.
Activate Extension. Available when the General > Extensions application function is set to Y, select to activate the extension for the selected Line XX for the highlighted room type that was selected on the Import Rooms tab.
Mandatory. Available when the Activate Extensions check box is selected, select the check box to insure that an extension number must be elected when a guest is checked in to this room. If an extension is not mandatory, then it can be assigned before check in, during check in, a room move, or anytime while the guest is inhouse.
See Also