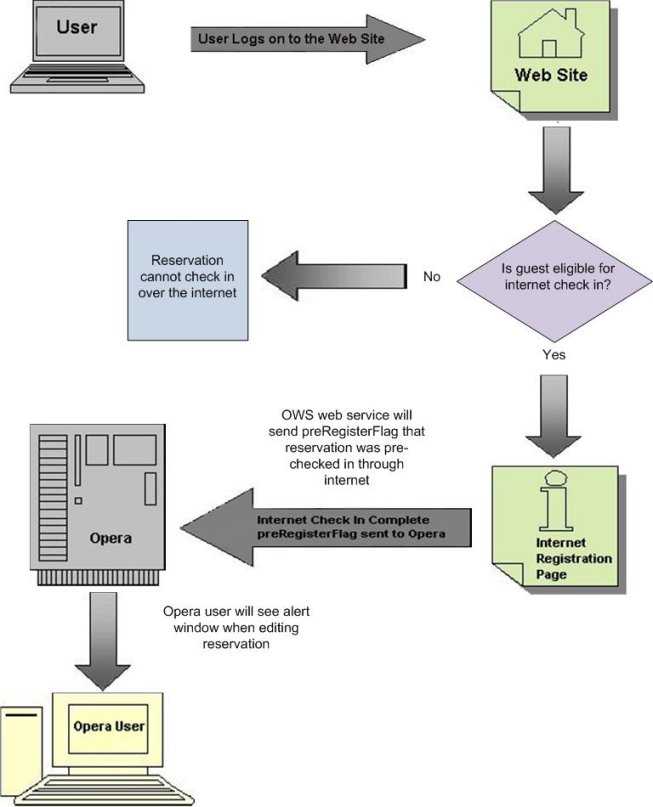
Internet Pre-Check In Configuration and Process Flow
Internet Pre-Registration Check In can be enabled for properties by setting the PRE-REGISTRATION CHECK IN application parameter to Y. Internet pre-check in allows guests or other individuals to check in reservations through the Internet prior to arrival at the property, or, depending on the Internet pre-check in restrictions that have been set, prior to the arrival date for the reservation.
Internet Pre-Check In Setup
Enabling Application Settings
To configure Internet pre-check in for a property, three property-level application settings must be enabled: Internet Check In, Internet Check In Trace Dept, and Internet Check In Alert Code.
- Go to PMS or ORS (property level) > RESERVATIONS > Parameters > PRE-REGISTRATION CHECK IN and set the application parameter to Y to enable pre-check in for the property via the Internet.
- Go to PMS or ORS (property level) > RESERVATIONS > Settings > PRE-REGISTRATION TRACE DEPARTMENT and set the application setting to a parameter value from the Parameter Values list. This will be the department code for the trace department setting. When a trace is created for the Internet pre-checked in reservation, the trace will function in a way similar to messages, in that traces can be created and attached to the guest reservation for internal messaging between departments. These internal messages will communicate information between departments about the Internet pre-checked in reservation.
- Go to PMS or ORS (property level) > RESERVATIONS > Settings > PRE-REGISTRATION ALERT CODE and set the application setting to a parameter value from the Parameter Values list. This value will be used to store the alert code, which will be created when the reservation is Internet checked-in. When a front desk agent searches for the reservation and selects the Edit button to edit the reservation, an alert window will open showing the reservation has been pre registered over the Internet. If a value is not specified for the application setting, “GEN” will be used by default as the alert code value.
Defining Restrictions to Limit the Availability of Internet Check-in
The next series of steps involves setting up the Internet pre-check in restrictions for the property, which are based on one of the following rule types:
- Special
- Market
- Time
- Origin
- Rate
- Guarantee
- VIP
- Member
When a reservation matches the criteria for the registration restriction, the reservation will not be eligible for Internet pre-check in.
- Go to ORS > Setup > System Configuration > Channels > Internet Pre-Reg. Restrictions. This opens the Internet Pre Registration Restrictions screen.
- Highlight the restriction you want to edit and select the Edit button or select the New button to add a new restriction. This opens the Internet Pre Registration Restrictions - New/Edit screen.
Notes:
• If you select Time as the Rule Type, additional fields will be available to define a time window restriction of "hours prior to" and "hours after check-in time" based on the property's official check-in time.
• When the RESERVATIONS > MOBILITY application parameter is active, the Rate Rule Type is not available, but is handled on the Rate Header screen.
- Complete the following fields:
- Rule Type (required) - The rule type on which the Internet pre-registration restriction is based.
- Property (required) - The property in which the Internet pre-registration restriction applies.
- Begin Date (required) - The start date of the Internet pre-registration restriction.
- End Date (required) - The end date of the Internet pre-registration restriction.
- Rule Details (required) - The rule details of the rule type. When the down arrow is selected, the list of values available will be different depending on what was selected for the rule type.
- Absolute (optional) - Only available when Time is selected as the Rule Type. When selected, the following additional fields become available to set the time rule restrictions for Internet pre-check in:
- Days Before - The number of days before the arrival date that the reservation can be checked in through the Internet. A zero will mean the day of arrival.
- Days After - The number of days after the booking date that the reservation can be checked in over the Internet.
- Earliest Time - The earliest possible Internet check-in time for a reservation based on the Time rule type.
- Latest Time - The latest possible Internet check-in time for a reservation based on the Time rule type.
- Hours Prior to Check-In (optional) - Only available when Time is selected as the Rule Type. Enter the number of hours before the property's official check-in time that the reservation will be eligible for Internet check in. The official check-in time for the property is based on the value entered in the Check In Time field on the Property Configuration screen.
- Hours After Check-In (optional) - Only available when Time is selected as the Rule Type. Enter the number of hours after the property's official check-in time that the reservation will be eligible for Internet check in.
- Select OK.
Now when a user searches for and edits a reservation that pre-checked in through the Internet, an alert window indicating that the reservation was pre registered will open from the Reservation screen.
In addition, if the INTERNET CHECK IN TRACE DEPT application setting was configured for the property, when a user goes to PMS > Update Reservation > Search > Options > Traces, the trace message will be displayed on the Traces screen indicating that the reservation was Internet checked-in.
Internet Pre-Check In Process
The diagram below explains the process flow of Internet pre-check in:


