Mailing Label Creation
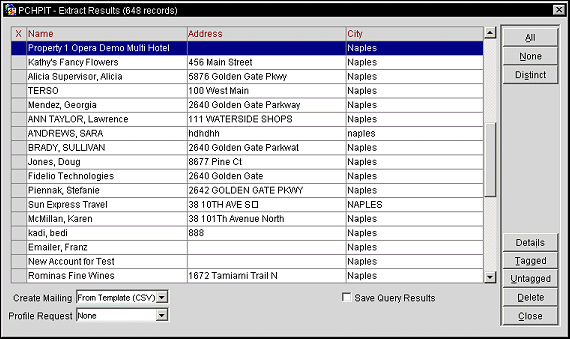
Mailing labels are created with OPERA by using the Data Extraction feature and creating the labels with a Microsoft Word template. The Extract Results screen appears when you select Miscellaneous>Data Extraction>Data Extraction Query then click the Process button. This screen shows your query results — the records that have been returned by your database query. The total number of records found is shown in parentheses in the title bar. Which specific data fields are shown in the search results grid depends on the query that you processed.

When choosing query results for inclusion in a merge file, you can take either of two approaches: you may select all items that you have marked with an X in the left-hand column, or you may select all items that are not marked with an X in the left-hand column. Use whichever method is easiest when working with a particular set of information.
Create Mailing.
Note: HTML formats are used preferably when the information contains extended byte characters, such as the Japanese or Chinese language.
Profile Request. Prepare custom output data files. These outputs can be directly merged into templates to prepare customized print or email responses.
Save Query Results. Check the box to save your query results, give them a unique name, and access them later by selecting Miscellaneous>Mailings>Extract Rules.
All. Automatically selects all of the query results.
None. Quickly selects none of the query results.
Distinct. Displays a Multi Select LOV in which the user can select the fields to check in the query extract results. After selecting the OK button on the LOV, distinct records in the result set are tagged eliminating duplicate records. Once this automated procedure is finished, the extract continues on as normal.
Details. Displays a LOV in which you can select to view the more details about the selected item in the grid.
Tagged. Creates the mail merge document or merge file from only the items that are tagged.
Untagged. Creates the mail merge document or merge file from only the items that are not tagged.
Delete. Deletes the highlighted item.
Choose From Template (CSV) or From Template (HTML) from the Create Mailing options.

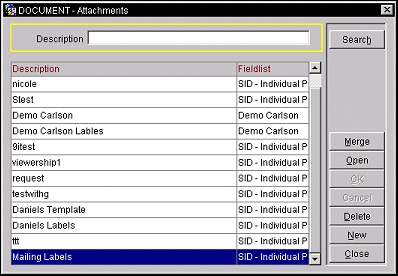
This screen lists a description of your existing Word templates (which are a type of "attachment" in OPERA), along with the field list used by each. (The field list is a set of fields that have been selected from among the fields available from a data source used in your data extraction query.) Click in the Fieldlist column to see the name of the template doc file, the file size, and the date when it was created or last modified.
You may select an already existing Word template, edit an existing template, or create a new template at this time.
Merge. Highlight an existing template and select Merge to use the extract results you just created, along with the named field list, to produce a merge file; this merge file is automatically used as the data source with the selected template. Macros must be enabled in your Word application in order to perform the merge. Merge does not give you an opportunity to make changes to the template before performing the merge.
Note: To modify the Word document for this mail merge only, you may close the merged document, edit the doc template, then create the merged document again by using the Merge button in Word. Any changes to the template made in this way will not be reflected in the template stored in the OPERA database. Use the Open option discussed below to make permanent changes to the Word template.
Open. Highlight a template and select Open to edit the template before performing the merge. When you use Open, you may make changes to the template and save the changed template when you are done. Using this option allows you to work with the Word template similar to the way you would if you were setting up a mail merge outside of OPERA.
When you return to the Attachment screen after editing the template, and possibly creating a merge document, the OK and Cancel options are presented. Select OK to initiate an upload to save your template changes for future use. Select Cancel to discard any changes you have made to the template.
Delete. Deletes the highlighted template.
New. Create a new Microsoft Word mail merge template. To create a new template you must first select (or create) the field list to be used along with your data extract results to create the merge file for use with the template. (A field list is a selection of fields from the data source of the data extraction query. Working with the Merge Field List screen is discussed in the following section.) The merge file will also determine what field variables you may insert in the Word template (via Word's Insert Merge Field option). Using this option allows you to work with the Word template similar to the way you would if you were setting up a mail merge outside of OPERA.
When you return to the Attachment screen after making the new template, and possibly creating a merge document, the OK and Cancel options are presented. Select OK to initiate an upload to save your template for future use. Select Cancel to discard the template.
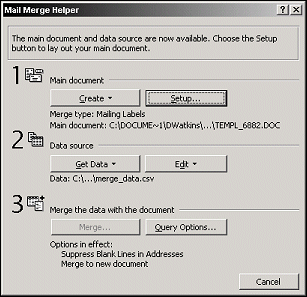
When Microsoft Word opens, be sure to select the Enable Macros button to continue with the merge. To help with the mail merge, select the Mail Merge Helper.

The Mail Merge Helper displays all the information needed to finish converting your query results into the mailing labels that you desire. Once your labels have been set up and contain the information that you want them to display, select the Merge button to merge your information into the mailing labels that have been setup. See Microsoft Word Help for more information on their part in the Mail Merge process.

From here, the mailing labels can be printed, emailed, or saved to be used at a later point in time.
See Also