Doorbook Export Data Definition (DOORBOOK) and Online Printing
The Doorbook Export allows the user to select from among a specific set of reservation-related data (pulled from the EXP_GR_DOORBOOK view) and print an online report showing any changes to the selected data fields.
The Doorbook export is available when the country mode is set to GR (Greece) and the Reservations > Online Printing of Changes application parameter is set to Y.
This feature requires that the OPERA Online Printing service be installed (as described below). To run the OPERA Online Printing service, the Exports > Country Exports application parameter must be set to Y, and the Reservations > Online Printer application setting must specify the name of the character mode printer to which online printing will be directed.
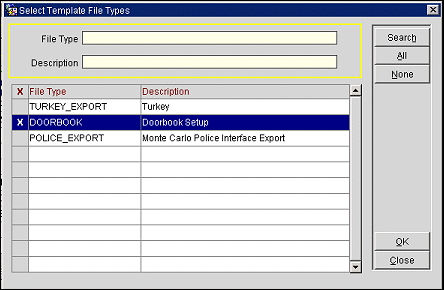
To set up the Doorbook layout, select Miscellaneous > File Export > Country or Configuration > Exports, Country Exports. The Export File List screen appears. Select the New button and from the list of templates select DOORBOOK.

When you return to the Export File List screen, highlight the Doorbook entry and select the Edit button. The Online Printing Setup screen appears.
File Type. View only. Doorbook file type appears here.
File Description. Enter a description for this file type.
Source. View only. The EX_PR_DOORBOOK dummy view is used for the Doorbook report.
Source Description. View only. Description of the Doorbook view.
Print Updates For. Select the down arrow to choose the fields for which updates are to be printed on the online printer. (These values are stored in the RESV_PRINTLOG_SETUP table.) The default fields provided as SID data are:
Departure Date. Reservation departure date.
Persons. Includes adults and children.
Complimentary Yes/No. Depends on the rate code of the reservation. If the rate code assigned to the reservation is set to complimentary, this will be Y; otherwise, N.
UDFC01. Hardcoded for Arrangements.
Travel Agent Name ID. Travel agent ID number.
Company Name ID. Company ID number.
Guest Name ID. Guest ID number.
Reservation Status. Reservation status.
Room. Reservation room number.
Source Name ID. Source ID number.
Inactive. Select this check box to make the Doorbook Export unavailable.
Filter Conditions. Enter any user definable filter conditions for printing.
Select the Print Columns button to display the default print setup.
Data |
Col. Width |
Formula |
NEW_SEQ_NO |
10 |
'|'||rpad(ltrim(to_char(new_seq_no,'999999999')),9) |
OLD_SEQ_NO |
10 |
'|'||rpad(ltrim(to_char(last_seq_no,'999999999')),9) |
GUEST_NAME |
26 |
'|'||rpad(trim(last_name)||' '||trim(first_name),25) |
COMPANY_AGENT_NAME |
13 |
'|'||rpad(decode(company_name,null,decode(agent_name,null,'Individual',agent_name), |
ARRIVAL |
11 |
'|'||rpad(to_char(arrival_date,'dd/mm/yy'),10) |
DEPARTURE |
11 |
'|'||rpad(to_char(departure_date,'dd/mm/yy'),10) |
ROOM_NUM |
7 |
'|'||rpad(room_num,6) |
PERSONS |
6 |
'|'||ltrim(to_char(adults+children,'99999')) |
ARRANGEMENT |
13 |
'|'||rpad(arrangement,12) |
NOTES |
73 |
'|'||rpad(decode(upd_type,'RESERVATION STATUS',DECODE(OLD_VALUE,'CHECKED IN',DECODE(NEW_VALUE,'CHECKED OUT','Checked- Out','Cancel Check-In')),'DEPARTURE DATE',trim(old_value)||'- >'||trim(new_value),trim(initcap(upd_type))||': '||trim(old_value)||'- >'||trim(new_value)),71)||'|' |
CRLF |
4 |
'CRLF' |
FOOTER_LINE |
130 |
rpad('-',130,'-')||'CRLF' |
DATE_OF_PRINTING |
30 |
Date of Printing:'||to_char(pms_p.business_date,pms_p.date_format())||'CRLF' |
TABLE_LINE |
130 |
rpad('-',130,'-')||'CRLF' |
TABLE_HEADER_1 |
130 |
|'||rpad('Sequence',9)||'|'||rpad('Prev.',9)||'|'||rpad(' ',25)||'|'||rpad('Company',12)||'|'||rpad('Arrival',10)||'|'||rpad('Departure',10)||'|'||rpad('Room',6)||'|'||rpad(' ',5)||'|'||rpad(' ',12)||'|'||rpad(' ',21)||'|'||'CRLF' |
TABLE_HEADER_2 |
130 |
|'||rpad('Number',9)||'|'||rpad('Sequence',9)||'|'||rpad('Guest Name',25)||'|'||rpad('Agent',12)||'|'||rpad('Date',10)||'|'||rpad('Date',10)||'|'||rpad('Number',6)||'|'||rpad('Pers.',5)||'|'||rpad('Arrangement',12)||'|'||rpad('Notes',21)||'|'||'CRLF' |
TABLE_SEPARATOR_LINE |
130 |
rpad('-',130,'-')||'CRLF' |
The online printing records are written into RESV_PRINTLOG. The printing utility will check this table and print all not-printed records. Records in this table will be purged as part of the purge routine when the reservations to which they are related are checked out.
This section is intended for OPERA installers who are configuring OPERA in countries where online printing functionality is required.
A line printer (dot-matrix printer) must be accessible in the network environment, a computer to run the online printing service on (NT Service). MSXML3 Components need to be installed on the computer running the online printing service.
Run the Online Printing installation program (OnlinePrnInst.exe). This will install all required files and create the online printing service.
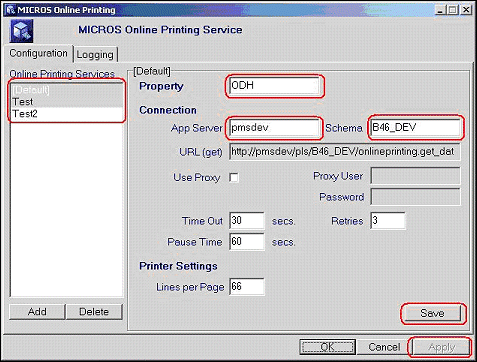
The values entered for "Application Server", "OPERA Schema" and "Property Name" will get stored as defaults for any new entry. All those values can be changed later in the configuration.
If MSXML3 is not yet installed on this computer check "Install Microsoft XML Components".
The program will be installed in %Program files%\Micros Systems, Inc\OPERA\Online Printing
The installation will not start the NT-Service.
Open the control panel and select the MICROS Online Printing shortcut to start the configuration program.
Defining an Online Printing Task
To add a new online printing task click on add or select an existing task and right click> "clone" to create a copy with a new name.
If you need to configure multiple tasks it is recommended to configure the [Default] task with the common entries like URL, timeouts etc, and the create copies of this entry with the "clone" functionality.
Note: The [Default] task cannot be activated. It serves as a template if you need to configure multiple tasks.
Required values:
Property. Property code configured in OPERA

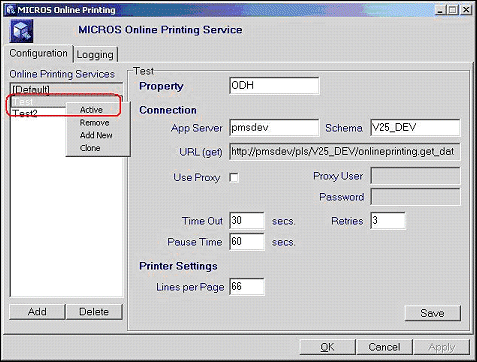
A newly added task is not active yet. To activate a task select the task and right click -> Active.
Inactive tasks are listed with a grey background, active tasks with a white background. Online printing Tasks can be added, deleted, activated and stopped without stopping the actual service.

Note: If the application setting ON_LINE_PRINTER is not defined any online printing task for that schema/property will be stopped (de-activated) automatically and needs to be activated manually once the application setting is updated correctly.
The service will log certain events and status messages in the system application event log. The event log can be found in Programs\Administrative tools\Event viewer.
Additional log messages are written to an application log that is viewed on the Online Printing Service screen Logging tab. The following options are available on this screen.
Debug Mode. For testing purposes, select this check box to display more detailed messages to the log. This may cause the log file to grow quickly. Use this option only to diagnose problems.
Clear Log. Clear and delete log file
Refresh. Refresh log file display from file.
Once the configuration options have been configured and saved, the Service tab becomes available on the Online Printing Service screen. Use the buttons on this tab to start and stop the service. You may also pause and resume the service.
See Also