
ORS Setup for the OXI_HUB Interface
Note: This check is for installation purposes only
A complete ORS configuration is crucial for the proper functionality of the interface. Some elements are mandatory and others are optional. Check that the following mandatory components for the creation of a valid message entry in ORS have been configured.
Mandatory elements for reservations, blocks |
|---|
Rate Codes |
Room Types |
Reservation Types |
Payment Methods |
Credit Card Types |
Market Codes |
Source Codes |
Exchange Rates between OXI_HUB CRS currency and ORS home currency have to be configured |
Mandatory elements for profiles |
Address Types |
Phone Types |
Membership Types |
Membership Levels |
Country Codes |
Nationality Codes |
Commission Codes for TA profiles |
Go to ORS and Login, path to Setup > System Configuration > Setup > User Configuration > Users.
Access to certain areas of OXI_HUB interface will require permissions linked to System Users. Access to these areas allows that user to Create, Edit and Delete entries and or values.
The External Database Setup in ORS is essential for OXI_HUB to run. Its purpose is to link each property in ORS to its respective PMS Type and database ID. The PMS Type in turn is directly linked to the external system ID for which business events can be created in ORS.
Note: External Database Setup needs to be done before activation of External System and Business Events Setup.
See External Database Setup for further details.
In ORS, go to Setup > System Configuration > Setup > License Code
The following licenses need to be active in order to run the OXI_HUB interface:
As soon as the licenses above are activated, the following external system IDs will automatically be available for configuration:
In ORS, go to Setup > Application Settings > BLOCKS
The following Function must be active for Group blocks to show Restrictions and set Restrictions. Restrictions can be sent from OPERA PMS to ORS.
SET BLOCK PICKUP RESTRICTIONS = Y
For proper Revenue Calculations and Point Calculation to be managed in OCIS the following configuration is required. Revenue types in ORS and OPERA PMS Revenue Bucket Codes have to be exactly the same as well as the Revenue Buckets Codes in ORS and OPERA PMS. Or the stay data being transmitted will be staged, (Suspended Stays) or revenue not properly calculated.
Revenue Setup:
In ORS and in OPERA PMS, go to Setup > System Configuration > Setup > Cashiering > Revenue Buckets > Bucket Types > SEARCH and make sure that there is Bucket type PROFILE. Next you will need to setup up matching Bucket Codes in each system. Follow the same path above but once you get to Revenue Buckets select to go to Bucket Codes. Select the property as needed and Bucket Type PROFILE.
Example: Screen shot of ORS Bucket Code screen with the edit screen open for 1st entry.
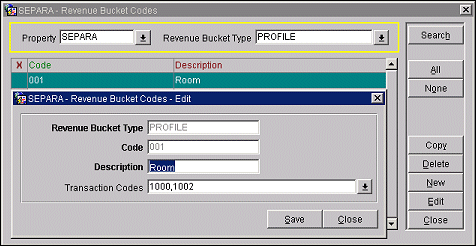
As shown in the sample screen shot above, the Revenue Bucket Type is PROFILE. The revenue bucket Code has to be a 3 numeric value. The Description field populated accordingly and all applicable transaction codes linked to the Revenue Bucket Code correctly.
Revenue Bucket Type. You must always have the type as PROFILE when creating New entries.
Code. You must always have a 3 numeric value.
Description. You can label according to the Transaction Codes you have linked (Room, Misc., F&B etc.)
Transaction Codes. You link all transaction codes that generate this type of revenue to this Revenue Bucket code. The transaction codes do not have to be the same between each system, it is only the Revenue Bucket Code that must be the same in each system.
Note: You will need a Revenue Bucket Code that will have ALL Payments linked to it. If the payments are not linked when a guest checks out of the hotel and Stay Data is sent to the ORS/OCIS database, then the amount of the guest stay will go up with a credit. This will cause a problem and the Stay record will staged with a Invalid Revenue Type.
Business Events in OPERA PMS have to be modified.
Profile OCIS setup:
Now that the revenue setup has been completed, setup for membership data and OCIS History is required. To calculate how many points to award current Members based on revenue and for CIS History Revenue Group Calculations.
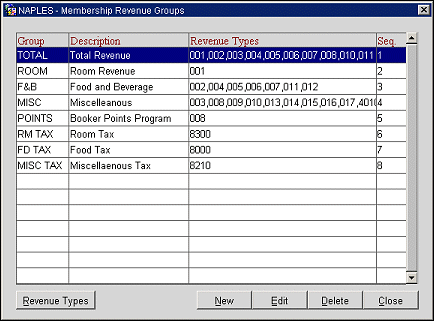
In ORS and in OPERA PMS, go to Setup > System Configuration > Setup > Profiles > Memberships > Revenue Groups > Membership Revenue Groups screen opens > select Revenue Types button. Membership Revenue Groups are not created until the Revenue Types are created. Membership Revenue Types have to be the same Revenue type Code as previously configured in the Cashiering application (see the Revenue Setup just above).
Example: Membership Revenue Groups (created after the Membership Revenue Types – see next example Membership Revenue Types).
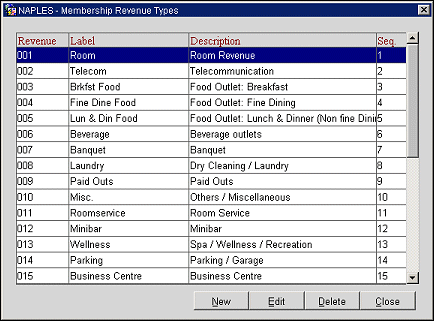
Example: Membership Revenue Types (see example of Edit for Revenue 001 following next).
Example: Edit screen of Revenue 001 for Accommodation, example of setup.

Keep in mind the Revenue Type field must be the same numeric value as the Revenue Bucket Code created in the Cashiering application. This is where you link the OCIS profile to the Stay Data based on those Revenue Buckets.
Revenue Type. Enter the corresponding (3) Numeric value that is the (3) numeric value as the Revenue Buckets configured in OPERA’s Configuration Cashiering > Revenue Buckets > Bucket Codes. Go here to see what has already been setup before creating your Membership Revenue Types.
Revenue Bucket Code. This is a pick-list of configured Revenue Buckets. Link the correct bucket to the Membership Revenue Type based on Room, Miscellaneous, Food and Beverage etc.
Description. Enter description for the Membership Revenue type that you are configuring.
Display Sequence. Enter numeric value for preferred display on screen.
For the properties that communicate with ORS/OCIS from Fidelio V6/V7 the Revenue Buckets in Fidelio V6 or V7 have to be replicated exactly the same as in the Fidelio PMS system. Using the previous outlines for Revenue Setup and for the OCIS Profile setup from above, configure the Revenue Buckets accordingly.
Setup Required in OPERA PMS
• Set the OPERA PMS parameter under RATES > RATE TIER to Y, to allow for Rate Tiers activation.
• In OPERA PMS go to Setup > System Configuration > Rate Management > Rate Classifications > Rate Tiers.
• In ORS Rate Tiers are configured here Setup > System Configuration > Rate Management > Rate Classifications > Rate Tiers. Select the OPERA Property that is utilizing the Rate Tiers and setup exactly the same way as OPERA PMS.
Example: Rate Tier screen from OPERA PMS.
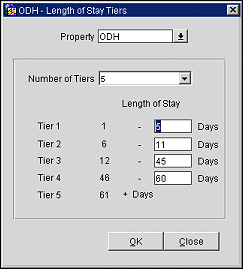
Example: Rate Tier screen from ORS.
In ORS go to Setup > System Configuration > Setup > Business Events > External Systems
In ORS go to Setup > System Configuration > Setup > Business Events > Configuration
Note: Business Events are pre-configured in the ORS when the OXI is installed. If manual intervention is needed then the External System and Business Events setup will be done after External Database setup.
See Also