Install Windows Azure Web Service for OEDS (for webProposal and webHotel)
Windows Azure is an open and flexible cloud platform that enables you to quickly build, deploy, and manage applications across a global network of Microsoft-managed data centers. This is intended to replace the HTTP Push support. The Windows Azure web service also facilitates the OPERA and webProposal Single Sign On feature.
Note. This applies to webProposal, webHotel, and Mobile websites. This applies to every system that uses OWS and OPERA.
Step 1. Install OWS-WS Gateway Version 5.1
Prerequisites:
- Windows 7 Service Pack 1 or Windows 2008 R2 Service Pack 1 or Windows 2008 SP2
- .Net 4.0 (dotNet \dotNetFx40_Full_x86_x64.exe)
- IIS 7
- Windows Server App Fabric, select default options when installing.
The prerequisite files are in the OPERA wizard:
- Opera\Tools\OS_SUPPORT\DOTNET\dotNetFx40_Full_x86_x64.exe
- Opera\Tools\OS_SUPPORT\DOTNET\WindowsServerAppFabricSetup_x64_6.1.exe
- Opera\Tools\OS_SUPPORT\DOTNET\WindowsServerAppFabricSetup_x86_6.1.exe
To install:
1. In OEDS Wizard there is OWS-WS Gateway Version 5.1, select to install.
OWS-WS Gateway Configuration
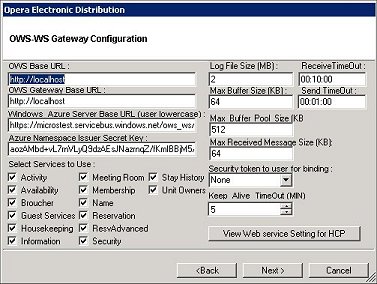
- OWS Base URL. Enter the protocol, server name, and the port (if non standard port is used).
- OWS Gateway Base URL. Enter the protocol, server name, and the port (if non standard port is used).
- Windows Azure Server Base URL. This is the URL for your instance of Microsoft Azure or other external Service Bus, which will be routing messages and presenting the OWS web services. The base URL needs to be https://microstest.servicebus.windows.net and then the path /ows_ws/…
Note. This URL needs to be unique for each install.
For example: For a development site the URL could be: https://microstest.servicebus.windows.net/ows_ws/hcp_prod_chaincode_resortcode and for the test site the URL could be https://microstest.servicebus.windows.net/ows_ws/hcp_test_chiancode_resortcode
Once you start the service the path will be created on microstest.servicebus.windows.net site.
Note. The path is required to be in lower case, if you enter upper case it will be converted to lower case when saving the configuration data.
- Azure Namespace Issuer Secret Key. Enter the key for the security access to your specific namespace within Azure. This key is specific to Microsoft Azure.
- Log file size (MB). Enter the log file size for the OWS-WS Gateway.
- Max Buffer Size (KB). Enter the maximum number of bytes that are used to buffer incoming messages in memory. The default size is 64 KB.
- Max Buffer Pool Size (KB). Enter the maximum size allowed for the buffer pool that stores the messages being processed. The default size is 512 KB.
- Max Received Message Size (KB). Enter the maximum size allowed for the received message.
- Security token to user for binding. When using the OAuth service in Azure to secure the connection with OEDS, this should be set to "RelayAccessToken," otherwise set this value to “None.”
- Keep Alive Timeout (MIN). This is the number of minutes to keep the URL alive on https://microstest.servicebus.windows.net. This setting is the poll interval, 5 minutes is the default.
- Receive Time Out. Enter the amount of time that an incoming connection can remain inactive before being dropped.
- Send Time Out. Enter the amount of time that an outgoing transaction is allowed to occur before the connection is dropped and an error is logged.
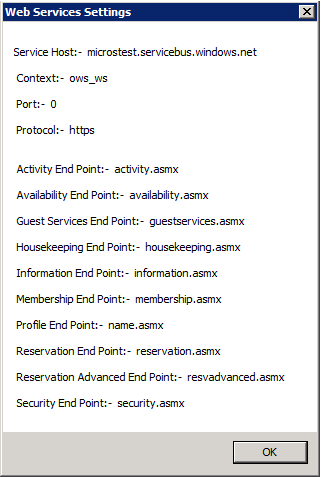
- After entering all the fields select “View Web service Settings for HCP” button.
Make a note of these values. These are the Web Service Settings that need to be entered in the webHotel Site Manager, under System Tools > Web Service Settings. See Also: The Web Service Settings help Topic in the webHotel Help for more information.
After the installation
You should see a new service “Opera WCF Keep Alive Service”, start this service.
- After the service is started you should see new URL at https://microstest.servicebus.windows.net (Normally, it takes 2 to 10 minutes for the URL to appear.)
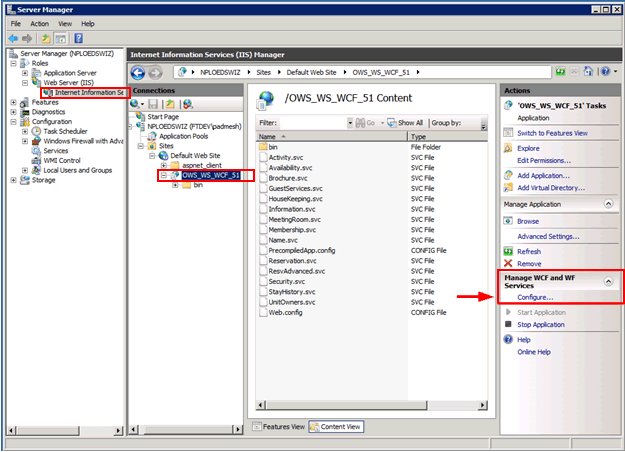
- Under Web Server IIS 7 configuration you will see new web service OWS_WS_WCF_51
- You can configure the Web Services to start automatically by selecting Configure… under Manage WCF and WF Services on your right side of the screen (see the example below).
Optional Steps
Note. If you do not start the above service then follow these steps.
- After you select Configure… select Auto-Start on the left navigation and then select the option button Enabled (all service will auto-start).
- You will be prompted with a dialog box that states "The application pool for this application/service needs to have the startMode set to AlwaysRunning for the application/service to successfully auto-start. Do you wish to set the application pool startMode when changes are applied?" (You can also change this setting using the IIS Configuration Editor).
- Select Yes on the above dialog box and select Apply button.
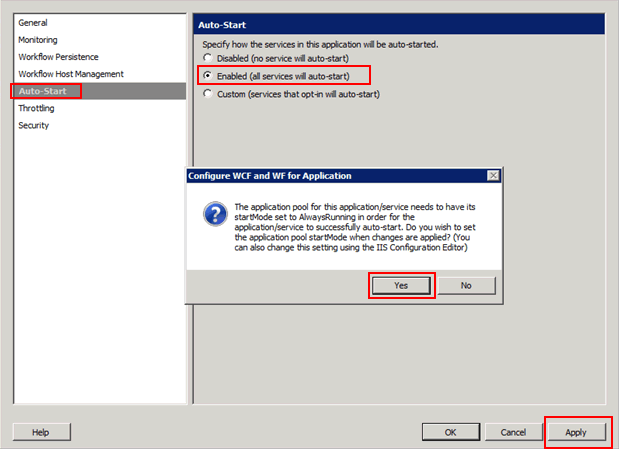
- Then when prompted with the dialog box that appears "All services in this application may recycle if you proceed with this change. Do you want to proceed?"
Select Yes and Ok.
Now you are able to start testing using the new web services. Add the asmx file name to the URL entered under “Windows Azure Server Base URL” (for example: https://microstest.servicebus.windows.net/ows_ws/information.asmx) for testing using WSTest.exe.
Step 2. Install Web Proposal Gateway
Required Pre-requisites
- .Net 4.0 - These pre-requisite files are in the OEDS wizard: (..\Installs\.Net 4.0\dotNetFx40_Full_x86_x64.exe).
- Tested on Windows 2008, Windows 2003 and Windows 7
To install:
- In the new OEDS install wizard under run Setup.exe to run a fresh install and upgrade the OEDS Web Proposal Gateway ( ...\Wizard_50\WebProposaGateway ).
- Select Web Proposal Gateway to install:
- Under configuration editor for Web Proposal Gateway Configuration.
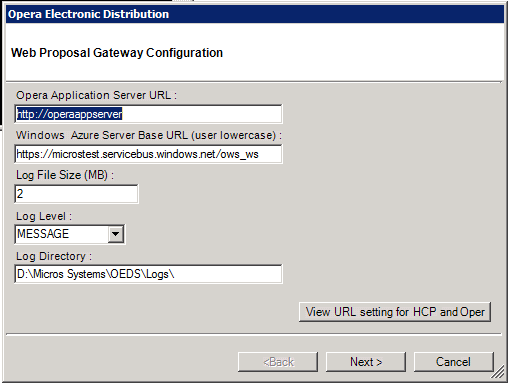
- OPERA App Server URL: Enter the protocol, server name, and the port (only if non-standard port is used).
- Windows Azure Server Base URL:
Note. If installing both OWS-WS gateway version 5.1 and the webProposal gateway, the Windows Azure Server Base URL will be disabled on this step.
The base URL needs to be https://microstest.servicebus.windows.net and the path /ows_ws/… It is required to be a unique URL for each install. So for example, the development environment URL could be https://microstest.servicebus.windows.net/ows_ws/hcp_prod_chaincode_resortcode and the testing environment URL could be https://microstest.servicebus.windows.net/ows_ws/hcp_test_chaincode_resortcode
Once you start the service the path is created on the (http://microstest.servicebus.windows.net ) site.
Note. For this path lower case is required, if you enter upper case it will be converted to lower case when saving the configuration data.
- Log files size for Web Proposal Gateway.
- Log Level for Web Proposal Gateway.
- Log Directory for Web Proposal Gateway.
- After entering all the fields select View URL Settings for HCP and Opera button, and select Next.
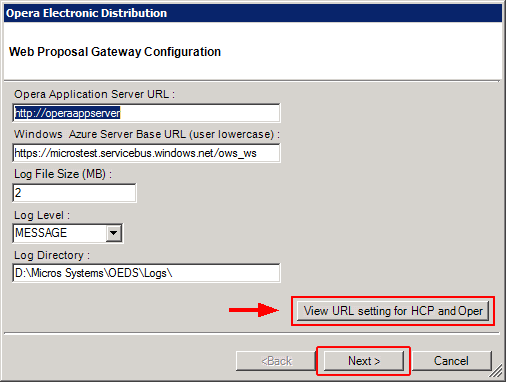
To get the values select the View URL setting for HCP Opera button on Web Proposal Gateway Configuration under OEDS Configuration editor.
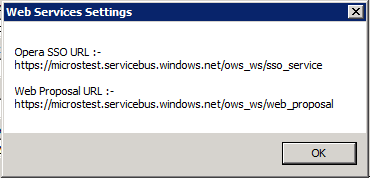
Below is an example Web Services Settings dialog box:
Enter these in the webProposal Site Manager and the OPERA Sales and Catering / PMS Configuration area:
webProposal Configuration Step. To Add the Web Service Settings to webProposal Site Manager
To enter the web service settings in the webProposal Site Manger, go to Manage Properties and select either the Chain, Brand, or Property from the left navigation. Select edit then the Settings tab.
See Also: The "Settings" topic in the webProposal help.
webHotel Configuration Step. To Add the Web Service Settings to webHotel Site Manager
To add the new web service go to Site Manager > System Tools and select Web Service Settings from the left navigation.
See Also: "Web Service Settings" in the webHotel Site Manager Help.
OPERA Configuration Step. To Add the Web Service Settings to OPERA Sales & Catering and PMS
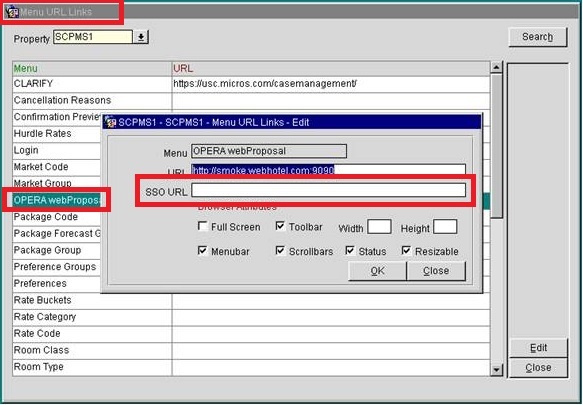
The webProposal feature is available in OPERA Sales and Catering and PMS. For Web Service Configuration in OPERA go to configure the OPERA S&C webProposal link under URL Setup. To access this in OPERA > go to Configuration > Setup > Menu URL Setup > S&C webProposal and define the OPERA SSO (Single Sign On) URL.
Note 1. This is only needed if the Application Parameter for SSO is active (in OPERA). To access this parameter in OPERA, go to Blocks > Parameters > webProposal > SSO Active.
Note 2. The Local JNDI name from OPERA stays the same.
See Also: Single Sign-On for webProposal from OPERA and About OPERA Sales and Catering webProposal
See Also
webHotel Help Topic: "Web Service Settings"
webPropsal Help Topic: "Settings"
About OPERA Sales and Catering webProposal
Installing OPERA Electronic Distribution Suite (OEDS)


