Field List Maintenance
Use the Field List Maintenance feature to set up and update merge field lists that can be used when creating mail merge documents. A field list is a selection of fields from tables in the OPERA database. The field list is used with your data extraction results to create a merge file. (See Data Extraction for details.)
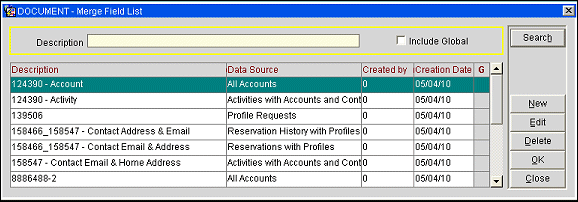
To access the Merge Field List screen, select Configuration > Database > Field List Maintenance. This screen is the starting point for creating or editing merge field lists. You can also access this screen from the Extract Results screen when you are creating a merge file (csv or html) output.

You can select an existing field list, edit an existing field list, or create a new field list for your merge file.
Select the Include Global check box to include field lists that were created as globally available (available to all properties in the chain). These field lists will have an X in the G (Global) column of the search results grid.
When you are creating a merge document from the Extract Results screen (Miscellaneous > Data Extraction Query or Extract Results), you are prompted to select the attachment that will provide the Word template for the merge. If the attachment you select does not have a field list associated with it, or if you opt to create a new template, the Merge Field List screen appears so that you can select the field list that will provide the merge fields for the document. Highlight your choice of merge field list on the Merge Field List screen and select the OK button.

To create a new field list, select the New button on the Merge Field List screen. To edit an existing field list, highlight your choice on the Merge Field List screen and select the Edit button. The Field List screen appears.

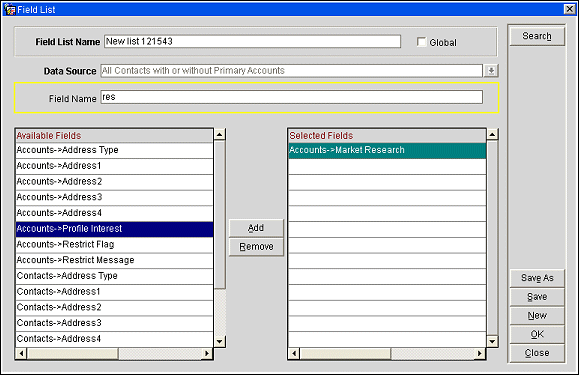
A field list name and a data source are required for each field list you create or edit.
Field List Name. When creating a new field list, a default name appears in the Field List Name field; you can edit this name. You cannot change the name of an existing field list (shown in blue).
Data Source. If you are creating a new field list, select the down arrow to choose a data source for the new field list. If you are editing a field list already created for a data extraction query, the data source is shown in this field and cannot be changed.
Note: The data sources available to you depend on the license codes and application functions that are active at your property. For a complete list of available fields in the SC$FIELDS table, click here.
Field Name. Enter the name or part of the name of a specific field and select the Search button to search for a field or fields to display in the Available Fields list.
Global. Select this check box if you want make the field list global (available to all properties in the chain).
The Available Fields list shows all the fields available from the data source shown in the Data Source field. (To find a specific field in the Available Fields list, use the Field Name search option.) The Selected Fields list shows the fields chosen for the currently displayed field list.
Build your field list by highlighting your field choices in the Available Fields list and using the Add button to move the field from the Available Fields list to the Selected Fields list. To remove a field from the Selected Fields list, highlight your choice and select the Remove button.
Select Save to save the field list in the Selected Fields list under the name shown in the Field List Name field. You can create several field lists, each with different choices of fields, while working with this one data source. To do so, use the Save As button to save each collection of fields in the Selected Fields list under a different name.
Select the New button to clear the Selected Fields list and begin a new field list.
When you are done, select OK to return to the Merge Field List screen. The new or edited field list will appear on the Merge Field List screen.
See Also