
OPERA Setup For the OXI Interface
OPERA Configuration Check
A complete OPERA configuration is crucial for the proper functionality of the interface. Some elements are mandatory and others are optional. Check that the following mandatory components for the creation of a valid message entry in OPERA have been configured.
Mandatory Elements for Reservations & Blocks |
Rate Codes |
Room Types |
Reservation Types |
Payment Methods |
Credit Card Types |
Market Codes |
Source Codes |
Exchange Rates between OXI CRS currency and OPERA home currency have to be configured |
Mandatory Elements for Profiles |
Address Types |
Phone Types |
Membership Types |
Membership Levels |
Country Codes |
Nationality Codes |
Commission Codes for TA profiles |
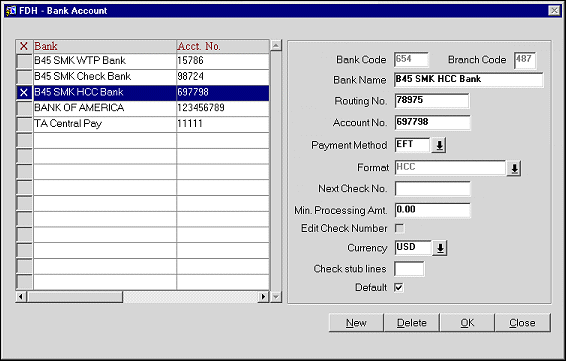
Bank Accounts – at least one account with each payment method EFT (CENT if no EFT license was purchased) and CHK has to be configured for Travel Agent profile commission processing. |
If the hotel works with owners, these have to be configured to allow OXI to set an owner default for downloading profiles and blocks |
Setup a Rate Code specific for OXI interface reservations. If any of the property rates have been subjected to Restrictions, this default rate can be used to insert the booking without failing it. This OXI specific Rate Code can be called ‘OXI Rate’, ‘OXI Default Rate’ or similar. This default rate is not to be subject to specific Rate Restrictions and Close Outs. This default is especially useful when properties and central systems do not exchange Rates or Restrictions.
Access to certain areas of OXI interface will require permissions linked to System Users. Access to these areas allows that user to Create, Edit and Delete entries and or values. Go to OPERA PMS, Login and path to Setup>System Configuration> Setup>User Configuration>Users.
For Products to be transmitted between two OPERA products then the Business Events for them have to be activated. Delivery of package messages is only when using OPERA ORS to an OPERA PMS. Packages on Reservations will now be transmitted with Quantity and Length of time the package will be available on the reservation.
Scenario Example:
Requirements:
Business Events and their data elements that have to be activated for package information to be passed back and forth. Business events are in Setup>System Configuration>Setup>Business Events>Configuration>select External system>select Module Rate.
All interfaces:
Go to System Configuration>Setup>Application Settings>Reservations, select option button 'Parameters' and set FIXED RATE the way it should work for your property.
All interfaces:
Function – FIXED RATES
Go to System Configuration>Setup>Application Settings>Reservations, select option button ‘Function’ and set FIXED RATES the way it should work for your property.
Function – IATA COMPANY TYPE
Go to System Configuration>Setup>Application Settings>Profiles, select option button ‘Functions’ and set IATA COMPANY TYPE. Set it the way it would work for your property if required. Verify if this is required for the central system to work before activating.
Setting – SESSION TIME OUT
Go to Setup>Application Settings>General, select option button Settings and set SESSION TIME OUT the way it will work for your property.
We recommend: initial setting of ‘5-10’ minutes before the session times-out for any OPERA access.
Rate Tiers
Block Restrictions
In OPERA, go to Setup>Application Settings>BLOCKS
The following Function must be active for Group blocks to show Restrictions and set Restrictions. Restrictions can be sent from OPERA PMS to ORS. SET BLOCK PICKUP RESTRICTIONS = Y.
Financial Transactions
In OPERA, go to Setup>Application Settings>Reservations>Parameter
SEND DEPOSITS TO ORS = Y then the financial transaction made on the reservation will be sent to ORS. Will then be inserted on the reservation there. This for transaction such as credit/Deposit.
SEND DEPOSITS TO ORS = N then there will be no transmission of the financial transactions to ORS system.
All hotels that receive TA profiles from external systems and that are using the OPERA Travel Agent Commission Handling.
Setup>System Configuration>Commission Processing>Bank Accounts
Example: In this example below we have linked the bank account ‘B45 SMK HCC Bank’ to the central payment method EFT, as the hotel has the Electronic Funds Transfer license active. This is also linked to currency code USD.
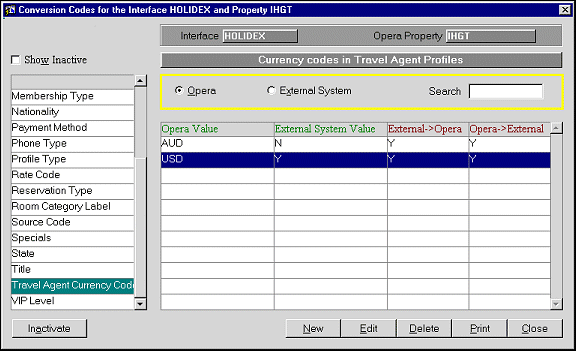
Example: In the example below we have linked the currency code USD to the external system value Y, which indicates the central commission payment for this interface. Holidex will always send Y and N. If you are using another interface, verify what values the external system will send, and configure the OXI TA currency code conversion table accordingly.
The OPERA PMS add-on license OPP_EXP must be active in OPERA.
OXI creates and transports the export files to the configured FTP server after a Night Audit has run. These files can also be transported to the FTP server when an OPERA user generates the export data manually. The export data is created as a part of the OPERA PMS sid_data at the time the OPERA PMS is installed at the property. Proper configuration is required for it to work with the OXI 2-Way. OXI will take the data from the OPERA tables and generate the messages for transportation. The OXI Communication Methods screen has to be setup with the proper FTP connection information.
Business events for the external system are automatically enabled as soon as an OXI 2-Way license is activated. To access the license code from OPERA, go to the OPERA Configuration>Setup>License Codes>PMS>Add on License. To access the license code from OXI, go to Interface Configuration>License Codes. Below is a screenshot of the existing OXI licenses. Select your correct interface, enter the license code, and activate it.
Example: The below screen is just a sample. Select your correct interface license name.
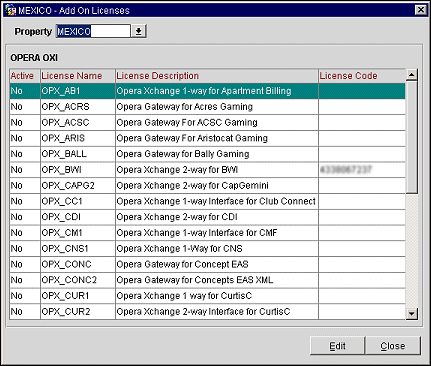
Note: For an upgrade from a 1-Way to a 2-Way of the same interface: When upgrading an existing 1- Way to a 2-Way, select the license active for the 1-Way and deactivate it by blanking out the Active column. Then, select the license for the 2-Way, enter the valid license code, and check the Active column.
Go to OPERA>Setup>System Configuration>Setup>Business Events>External Systems.
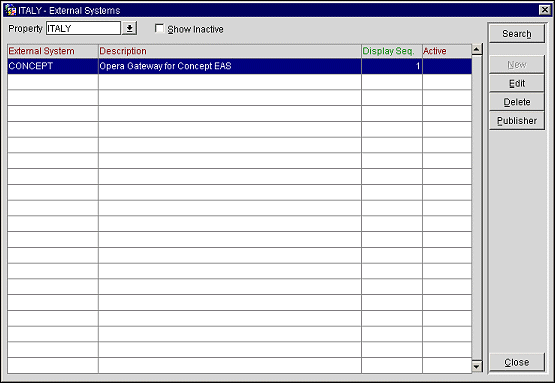
The external system ID for your interface has automatically been created at the moment you have entered the OXI 2-way license code. This is the interface user ID that OPERA will use to recognize transactions from this external system. This has to be active for messages to leave OPERA through the OXI interface.
Note: Make sure that the external system is ONLY being activated at the moment you are ready to start using the interface. Do not activate the external system while you are still configuring OPERA and OXI, as this will create unnecessary business events that have to be deleted manually afterwards.
See: OPERA External System & Business Events Setup
In OPERA go to Setup>Configuration>Setup>Business Events>External Systems>Configuration. Business Events are required in OPERA to send messages to an external system. What exact business events you need to configure depends entirely on the nature of the interface. If your interface transmits reservations and profiles to the external system, you need to configure reservation and profile business events. If rates and inventory have to be sent, you need to configure business events for rates and inventory, and so forth.
Example: Example of profile business event configuration.
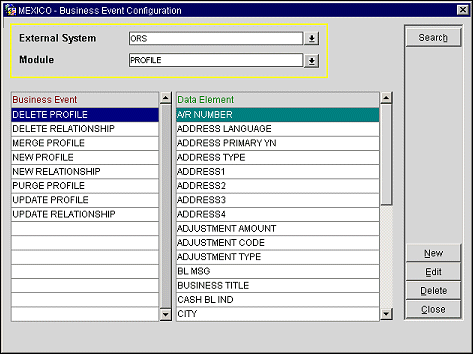
Select your external system and the module you would like to configure business events for.
Example: Sample of data element selection within the business event NEW PROFILE.
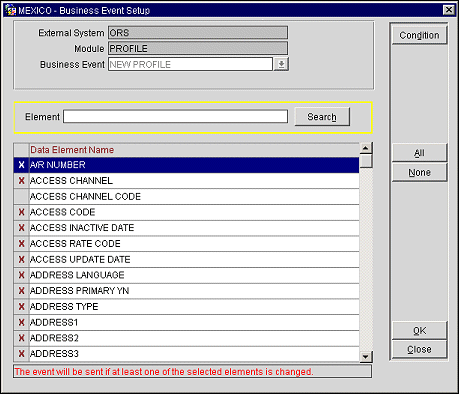
Selection of the Data Element Name is done by selecting in the X column to the left of the data element. When a Data Element Name is selected here and an action is carried out in OPERA that involves that data element, a business event is generated. Which then becomes a message to the external system.
In the example above: The module is Profile and the business event is ‘NEW PROFILE’. Currently highlighted is the A/R NUMBER data element name. When this data element is activated with an X; a new profile with an AR Number populated will trigger a business event, and thus a message to the external system. Once a data element in the business event is activated, it will be part of the business event record that is created each time a user performs an activity in OPERA (e.g., create a new reservation). OXI will read the data from the business event outqueue table and will create a message from it, which is visible in the OXI message status table.
Another Example: The other purpose of an active data element within a business event is that a message will be created as soon as the OPERA user changes something in that particular element. Let’s assume that you are changing the number of adults in an existing reservation in OPERA, and nothing else. If ADULTS is an active data element in business element ‘UPDATE RESERVATION’, a business event record will now be created and OXI will create an upload message from it.
See Also