Extended Titles
With OPERA offering added support for all National Character Set languages, you can configure extended titles and define which language each title belongs to by entering a language code such as Chinese, Japanese, Spanish, Arabic, Thai, Korean, or Hebrew. The extended title functionality is available when the application setting General > Functions > Alternate Name is activated.
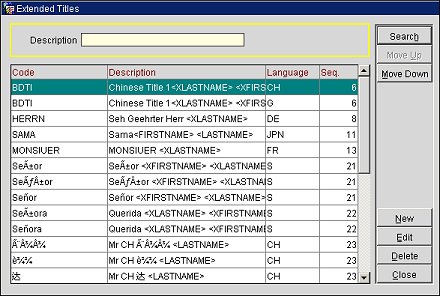
Select Configuration > Profiles > Titles > Extended Title to create or edit codes for alternate titles that use double byte languages. The Extended Titles screen displays. The titles entered here appear in the LOV of alternate titles, for users' selection, on the guest Profile Screen when the Alternate Name globe icon is selected (see Alternate Name for more information). By selecting alternate names and titles, guests from other countries can be identified according to their native custom. For example, if your guest is Japanese and staying at a hotel in New York City, USA, you may want to verbally greet and acknowledge the guest in writing using their originating language, title, and name (i.e. Mr. Suzuki can be identified as Suzuki-Sama. The guest's name and title can also be displayed and written using double-byte Kanji characters, if configured in Character Conversion.)

Code. A code up to 20 characters in length that identifies the extended title.
T.Suff. A title suffix is a number that identifies the unique combination of Title Code, Description, and Language.
Note: When the Advanced Title application setting is activated (Profiles > Parameters > Advanced Title), the Code identifying the title and language can also include additional titles meeting the needs of certain countries, for example, including the social title along with the business title (i.e. Frau Doktor). In these cases, title suffixes must be added to distinguish the different titles. Merge codes for variable information such as the guest's <FIRSTNAME> and <LASTNAME> can also be included. See Advanced Title for more information.
Description. The description of the title code that may include the combination of title (i.e. Mr.) with the individual's first <FIRSTNAME> and/or last name <LASTNAME> (i.e. Mr. Albert Jones) to create a salutation.
Language. The language code to be associated with this title. All extended titles associated with a specified language code will be available for selection when that language is chosen in the Language field on the guest Profile screen.
Seq. The sequence number that controls the position of this title when a list of titles is presented. When more than one extended title has the same Display Sequence number, the titles are presented in alphabetical order.
Move Up/Down. Use the Move Up/Move Down buttons to move a specific extended title up or down through the list; doing so will also change the sequence number of the selected code.
New. Select New to create a new extended title. The Extended Titles - New screen appears.
Edit. Select Edit to change an existing extended title. The Extended Titles - Edit screen appears.
Delete. Select Delete to remove an existing extended title.
Note: If a title or extended title has been assigned to a profile, you can delete it from configuration. However, deleting the title from configuration does not remove the title/extended title from the profiles where it has been assigned. The deleted title/extended title will also be kept on stationery and reports where it has been used. Once deleted, however, the deleted title/extended title will not be available for selection from LOVs going forward.
TITLE and EXTENDED_TITLE are stored in the ENTITY_DETAILS table and are not property specific.
Close. Select Close to exit out of the Extended Titles screen.
Any title can be written into OPERA without any limitation on characters of any language. Use the Extended Title feature to define the greeting to be used when addressing the guest both verbally and in confirmation letters or profile mailings.
As an additional step required within the Extended Title configuration you can enter merge codes within the Description field. By placing merge codes in this configurable field, the corresponding values will pull into the Salutation field for guest correspondence. Merge codes that can be used include<XLASTNAME> and <XFIRSTNAME>.
Note: If you want the option of adding additional titles along with a social or business title, activate the Advanced Title application setting (Profiles > Parameters > Advanced Title). See Advanced Title for more information.
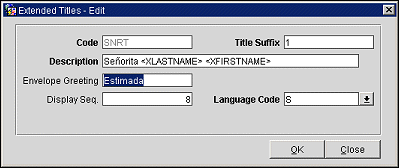
To create a new extended title, select the New button. To edit an existing extended title, highlight the record you wish to modify and select the Edit button. The Extended Titles - New/Edit screen displays.
 g
g
Provide the following information:
Code. Enter the code for the title (e.g., Mr, Ms, Mrs, Capt, Rev, Hon). Up to 20 characters are supported. This field is read-only in edit mode and cannot be modified.
Title Suffix. This field is available when the Advanced Title application setting (Profiles > Parameters > Advanced Title) is activated. See Advanced Title for more information. Enter a suffix number that identifies the unique combination of Title Code, Description, and Language. Users cannot insert the same Title Code more than once without a Title Suffix.
Note: When Global > Profiles > Parameters > Advanced Title = Y, the Title Suffix functionality will be available, and the “Title Suffix” field will be displayed on the Titles-New/Edit screen. With Title Suffix, by assigning a different suffix number, a user can configure many different salutations and envelope greetings for the same Title Code. When Global > Profiles > Parameters > Advanced Title = N, the “Title Suffix” field will not display and the Advanced Title functionality is not available. However, with the Advanced Title application parameter set to N, a user can still create different titles using the same title code. The difference is that with Advanced Title parameter set to Y, a Title Suffix is required when creating titles with the same title code. See the tables under Advanced Title section for examples on how this works.
Description. Enter the default salutation to be used with the title. The salutation can include merge codes for variable information such as the guest's first name and last name (e.g., Dear Mr (LASTNAME>, Monsieur <FIRSTNAME> <LASTNAME>, or Estimada Señora <LASTNAME>). The salutation can also include the business title along with merge codes for variable information such as the guest's <FIRSTNAME> and <LASTNAME>.
Envelope Greeting/Business Title. The name of the envelope greeting or business title that will be used along with the social title, such as Doctor. When this field is populated, the greeting or business title will appear in the Titles screen at the Profile Screen, ensuring that the correct business title and Code are entered when creating or selecting a profile. When the Advanced Title application setting is activated (Profiles > Parameters > Advanced Title), the label name here is Envelope Greeting. When Advanced Title is not activated, this field is labeled Business Title.
Language. Select the down arrow to display a list of Language Codes. Choose the code to be associated with this title. All titles associated with a specified language code will be available for selection when that language is chosen in the Language field on the guest Profile Screen. The language selected here is the language which you use to exchange correspondence with the guest.
Seq. Enter a sequence number to control the position of this title when a list of titles is presented. If more than one title has the same Display Sequence number, the titles will be presented in alphabetical order.
Once the information is entered/modified, select the OK button to apply the changes.
See Also