Membership - Export to Fulfillment House Screen Design
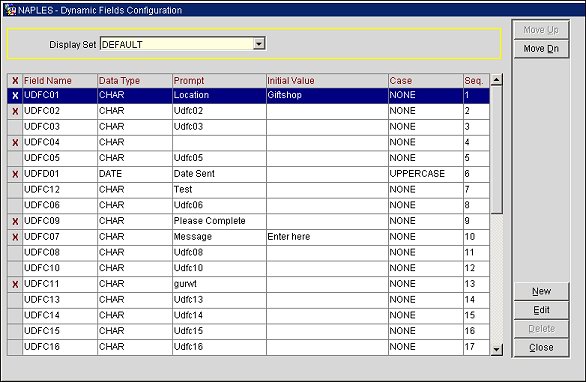
The Award Design screen provides fields that can be added or modified for the design of the Export for Fulfillment House screen. This screen is available when the OPI<version number>OCIS license code is active. The Export for Fulfillment House screen is used for issuing awards or exporting award information. Users with permission (Setup Config>SCREEN DESIGN - Screen Painter) can access the Award Design screen. This screen is accessed through Configuration>Profile>Memberships>Award Screen Design. The Dynamic Fields Configuration screen appears.
When the Blocks>GROUP ROOMING LIST EXTEND application parameter is set to Y, you can access the Dynamic Fields Configuration screen from Setup>System Configuration>Reservations>Business Blocks>Rooming List Screen Design. When accessed from Business Blocks, this screen can be used to configure UDF display sets for properties. These display sets are available as values in the Blocks>GROUP ROOMING LIST DISPLAYSET application setting for the property. The display sets that are configured for the property will be available on the Group Rooming List for the property.
This screen provides the user with the ability to define new fields reading from left to right on the bottom portion of the Export for Fulfillment House screen. Also, the user can:

If you want to edit or add fields to an existing Display Set, select the Display Set from the LOV. The display set fields will display in the grid. (You can create a new Display Set by selecting the New button. See Creating a New Display Set.)
X. X indicates the field will be visible on the Export for Fulfillment House screen. Blank indicates it will not be visible. This can be selected and deselected in the X column or by selecting the Visible check box on the Edit Field screen.
Field Name. Identifier of the field, hard-coded.
Data Type. The type of data that will be allowed to be entered, either CHAR (alpha- numeric characters), DATE (calendar), or NUMBER (numeric digits only).
Prompt. The label of the field that will appear in Fulfillment screen. This can be created by selecting the Edit button.
Initial Value. The initial information (if any, such as instructions or examples) in the field that can be overwritten with new information by the user.
Case. Defines if the text is required to be upper or lowercase.
Seq. The placement of the field on the lower-portion of the screen, from left to right.
Move Up/Move Down. Highlight a field and select the Move Up or Move Down button to position the field on the screen. The field's sequence number automatically changes.
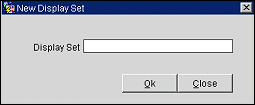
New. Select the New button to create a new display set. The New Display Set screen appears.
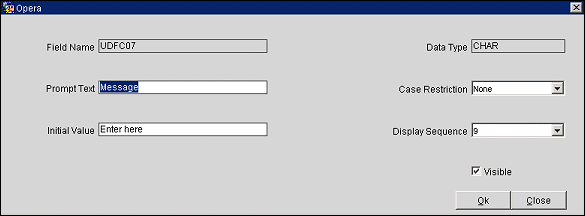
Edit. Select the Edit button to change the individual user-defined fields. The Edit Fields screen appears.
Delete. To delete a field from the
Enter the name/code of the new Display Set and select the OK button. The new set will appear and you can edit the fields as necessary.


Field Name. Identifier of the field, hard-coded and read-only.
Data Type. The type of data that can be entered for this field, either CHAR (alpha-numeric characters), DATE (calendar), or NUMBER (numeric digits only). This field is read-only.
Prompt Text. Enter the label for this field.
Case Restriction. Enter whether you want character restrictions on this field: None, Lowercase, or Uppercase.
Initial Value. Enter the initial data for this field, if desired.
Display Sequence. Enter the sequence order you want this field to display, from left to right.
Visible. Selecting this checkbox makes the field visible on the screen. To make it invisible, unselect the checkbox.
OK. Select this button to save your changes.
See Also