ORMS ADF11 Navigation
Note: This topic applies to ORMS ADF11.
Prerequisites
- Ensure that the application setting ORMS>Parameter>ORMS ADF11G is set to Y.
- Ensure that the application setting>GENERAL>Settings>BASE ADF URL has the correct path for the ADF11 Application, for example: http://specialhoteladf:9003.
- Ensure that you have prepared OPERA for ORMS. See Preliminary Setup in OPERA for ORMS (for v5.0.02.03+).
- Ensure that you have activated ORMS. See Preliminary ORMS Setup (for v5.0.02.03+).
Permissions
The permission you need to access ORMS and the Home Dashboard is Revenue Management>ACCESS ORMS. Permissions to access other dashboards can be granted. See Preliminary Setup in OPERA for ORMS.
ORMS Sign-On
- At the OPERA Single Sign On screen, enter your Username and Password.
- If more than one OPERA database schema is available to you, select the down arrow to choose the OPERA schema you want to log into. The last-accessed schema is selected by default.
Select the ORMS application button to access ORMS.
- Depending on the ORMS configuration status, you will either automatically access the Property Activation screen if one of the properties has not yet been configured (see Preliminary ORMS Setup), or in a single-property environment when the property has been configured and modeled, the application loads with this ORMS logo and status message.

- After the application loads in a single-property environment (when the property has been configured and modeled), the Home Dashboard is the first screen that displays.
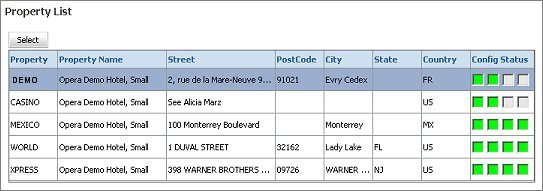
- In a multi-property environment, you will see the list of properties in your schema and their configuration status in the Property List grid. The Config Status column contains four different possible states for each property:
- 1 green box: License is active, but property has not been activated yet.
- 2 green boxes: Property has been activated and property needs to be configured.
- 3 green boxes: Property is in the process of modeling.
- 4 green boxes: Property has been modeled and all ORMS screens are available.
To select the available property, either double-click the property or highlight the property and choose the Select button. You will access the Home Dashboard.

ORMS Header
First Header Example - Front-End and Common Options
The top of each dashboard in ORMS contains the OPERA RMS Logo and Header.
The Header also contains links which you can select and navigate to other dashboards and functionality within ORMS. The highlighted/bold link indicates the dashboard or screen that is currently open (i.e. in the first Header example above, the Home Dashboard is open).
If you have permission to other functionality, select any of the links to access another dashboard for viewing and analysis, including:
- Home
- Forecast Analysis
- Blocks
- Multi Property - Available only in Multi-Property Environments.
- Configuration - When you select Configuration, the configuration functionality links appear (see second Header example below).
At the top right of each Header on every dashboard are several other options that can always be viewed and accessed, no matter the dashboard you are on (Front-End and Configuration):
- Reports - opens the Reports Overview page where you can select individual ORMS reports for viewing and printing.
- Setup - provides options for skin colors and back-end logging.
- Help - opens context-sensitive online help for the specific dashboard or screen you have open (i.e. if you have the Home Dashboard open, selecting the Help link opens the Home Dashboard online help).
- Exit - closes the ORMS application.
- Beneath the options, the current business date displays.
The Title Bar displays the property name, address, telephone number, and currency used at the property. The logged in user name appears at the end of the Title Bar.
- In a multi-property environment with more than one modeled or pre-modeled property, the Property LOV displays in the Title Bar
 . Users with access rights and permissions to other properties can select the LOV and choose either the modeled or pre-modeled property they want to work with. The sections on the dashboard refresh data specific to the selected property. In a single property environment or in a multi-property environment where the user has rights to only one property, the property field is read-only.
- When a modeled property is selected, both front-end and configuration dashboards will be available.
- When a pre-modeled property is selected, only configuration dashboards will be available.
- Users can access other configuration dashboards (if they have permission) and make adjustments that are available prior to modelization.
- Users can view the Verify Configuration screen to see the property configuration status and any warnings.
Second Header Example - Configuration
When the Configuration link is first selected, Seasons and Events is the default configuration dashboard that appears. All the other Configuration link options are listed with Configuration and the name of the open dashboard in bold, i.e. Seasons and Events. As stated previously, permissions must be granted to access these links. Configuration options include:
- Seasons and Events
- Yieldability
- Yield Category
- Price Configuration
- Booking Class
- Forecast Groups
- Groups
- Alerts and Rules
- Hurdle Schedule
- Miscellaneous
- Verify Configuration (only available for a pre-modeled property)


