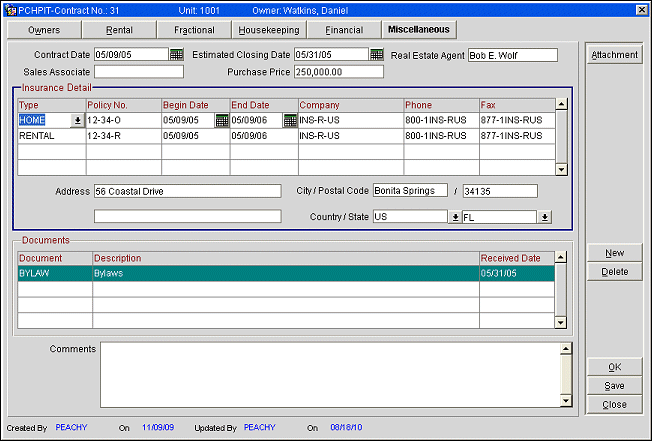
Miscellaneous Tab
When the OPV_<version number> Opera Vacation Ownership System license code is active, select Ownership>New Contract to create a new contract, or Ownership>Update Contract to update an existing contact.
Note: If you are updating an existing contract, the Contract Search screen appears. Select the contract you want to work with and then select the Edit button to access the Contract screen.
Note: You can quickly access up to 10 of the last-used (created, opened, or changed) contracts by selecting Ownership>Recent Contracts, and then selecting the contract. You must first activate the Recently Used feature (available when the General>Recent Used Records Menu is set to Y).
From the Contract screen, select the Miscellaneous tab to set up various information for the contract and unit.

The Miscellaneous Tab of the Contract screen displays the following information.
Contract Date. Select the Calendar button and select the date of the contract. This date represents the date that the contract was submitted to the Owner.
Estimated Closing Date. Select the Calendar button and select the approximate closing date for the unit.
Sales Associate. Enter the name of the sales associate for the unit.
Real Estate Agent. Enter the name of the real estate agent for the unit.
Purchase Price. Enter the purchase price of the unit.
Type. Select the down arrow to choose the type of insurance (See Insurance Types for details).
Policy Number. Manually type the insurance policy number.
Begin Date. Select the Calendar button to choose the beginning date for the insurance policy.
End Date. Select the Calendar button to choose when the insurance policy expires.
Company. Enter the name of the company who holds the insurance policy.
Phone. Enter the phone number of the insurance company.
Fax. Enter the fax number for the insurance company.
Address. Enter the main address of the insurance company.
City / Postal. Enter the city and postal code for the address.
Country / State. Enter the country and state that pertain to the insurance company's address.
Document. Select the type of document it is by selecting the down arrow (See Document Types for details).
Description. Displays the description for the document type.
Received Date. Select the Calendar button to choose the date the document was received.
Comments. Enter any comments.
Attachment. Available when the General>File Attachments application function is set to Y, select to add an attachment file to the highlighted document. The documents that can be selected are configured from the Configuration>Ownership>Codes>Document Types (See Document Types for details). If no Attachments have been configured, they can still be uploaded from another location on the machine. Simple click on the Attachment button, find the location where the attachment resides, and click on the Upload button. The file you upload must be within the size specified in the application setting Activity>Attachment Maximum Size.
New. Select to add an insurance type or to add a new document.
Delete. Select to delete the highlighted insurance or document.
OK. Select to save and close out of the Miscellaneous tab.
Save. Select to save all of the modifications made to the Miscellaneous tab.
Close. Select to close out of the Miscellaneous tab.
See Also